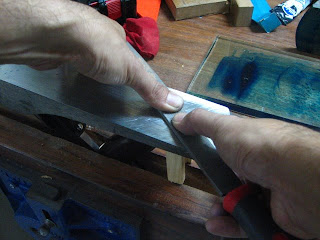
It is easy to get thin shavings down to thousands of an inch, but it seems you still end up with low portion at the ends of your boards. Check the sole of your handplane ( the easiest is with a straight rule ) and if it isn't flat then you now know the cause. An uneven sole will give false reference for the blade at the start and end of the board/piece thus leaving you with either low or high ends. Some handplanes like LN and LV boast flatness to a high degree of accuracy, but besides not being available to Filipinos are priced much higher than the Stanley ( which off course is you get what you pay for ). I have several Stanley handplanes one of which is from my grandfather No.4 (dated 1938) and is truly flat. Unfortunately the others are recent buys and out of the box, their soles are TERRIBLE! Here is what I did to my new Stanley No.5 to tune it up.
Tools and materials used:
flat surface (1/2" glass)
mechanic's blue
flat files (coarse and fine)
roller (I used a lint remover)
The process:
Start off by removing the handplane chip breaker and blade and clean thoroughly especially the sole. then spread the mechanic's blue to the glass and spread evenly with a roller to create a thin blue film.


then place the handplane sole down to the glass and press lightly.

then lifting the handplane straight up, you will see the high spots making contact with the flat surface. this is what you will need to scrape off.

I mount the handplane upside down (sole side facing up) on my bench vise with the frog intact for a secure filing. You don't want it moving around.

With a straight rule you can see the low spots against the light and will be the deciding factor as to how much needs to be removed.

Others will recommend using the scary sharp method (in which a sandpaper is mounted on the flat surface) and flattening with it. Well I have tried it and I can tell you that besides the process is easy, it tends to leave your plane sole convex. this is due to the sandpaper removing the material faster on the sides or concave if you continue using the sandpaper longer than intended, because the middle will wear slower than the corners. Besides, it takes forever to get this process done. I have tried it and it left my arms sore and the soles not close to flatness.
Now depending on the blue markings you can scrape metal from either direction. but upon closer inspection on mine, I noticed that the front area is pretty much flat till the mouth area. So I decided to remove metal from the back portion first.
I removed the blue keeping a mental picture of where it was (this prevents clogging the files and knowing where to stop filing). Keep your fingers or apply pressure in the center of the file, this prevents it from racking side to side which will leave you with low spots at the corners.

I start filing vertically, this gives me reference to a leading edge and not creating another low spot. Vertically from left then from the right leaving cross pattern and removes faster too. Which leaves me with a warning "remove little at a time and continuously check your progress" its not an easy process and it will test your resolve...

After a considerable amount of metal has been removed from the back I can now move to the front portion. Again Always Check!
After removing a certain amount from the front, I came up with this. Low spot at the middle area. I'm still alright though as I would want the front area and right after the mouth to be flat. It should be After the mouth!

File some more until I am happy with the results. and before finishing I scrape the sole (using the file as a scraper) forward to give a smoother consistency and file lightly lengthwise just to smoothen the surface. Again keep those fingers within the sole's center as much as possible.

Check for squareness and flatness with the straight rule and if everything is to your satisfaction, clean and wax the sole and the sides. Install the blade and chip breaker then plane away. After several passes, you should be left with a straight piece of wood.

Now, purist will double check the sole's flatness with a feeler gauge against the flat surface. I can't find mine so I'll just skip that for now. Oh and here is the planed surface.

This is how I flattened my handplanes, now, should you try to follow this process, be aware of the risks and that you can damage your handplane and that I will not be responsible for your actions. For what its worth, I hope this helps though...
Leave a comment when you can. I would appreciate this.

No comments:
Post a Comment