Monday, February 16, 2009

Tool Review: Chinese made Combination Square Set

Introduction:
Personally I am not really big on Chinese tools, let alone lay-out tools. But this one caught my attention the moment I saw it. I just came from another store that carried the same kit but is a Starrett brand (which I really want but could not afford). So, I asked to see and inspect the item. Upon close inspection, the build is quite similar to Starrett (tight and solid), made some lay-out lines and bought the item.
Included in the box:
A laser etched rule, combination square, protractor guage and a center marking guage.


I also have a Stanley combination square and made a heads up comparison. Let us start with the metal rule. Note the difference in marking thickness, the Stanley marks could fit three lines of the Chinese made rule which could add to inaccuracy.

I then proceeded to the combination square and their hold downs. Which was similar until close inspection.


Both combination squares seem solid, the Chinese square seems to be built slightly better though.The Stanley hold down had coarser teeth spacing and was surprised to find a flat side on it. I have had my Stanley square for a while now and it has slid along the hold down many of times producing poor and inaccurate lines, the Chinese brand on the otherhand is solid and has never slipped. It made me think that a tool like this (Stanley) could only be made by... Stanley, Hahaha.


Lets make some lay-out lines. One way to check if a square is square is to lay lines parallel to each other with the same rule in the opposite side.


As for the rest of the items, I went to the protractor and layed-out a 45° angle, and with another protractor I checked on it and is very pleased with the results.


I now checked on the center marking gauge. I wanted to show that the gauge can be used for cylindrical items and all I can find is this plastic cup. So here it is.


My Results:
This brand definitely outclass the Stanley made combination square in more aspects than one. With a Php 2,000.00 price tag it is well worth it (the Starrett set costs Php 11,000.00 ++). Will I recommend it? Hell yeah, its a great deal for a great item.

Build/Construction: 8/10
Accuracy: 9/10
Price/Cost: 7/10
Overall: 7/10

Pls. post your comments, I would appreciate it.

Sunday, February 15, 2009

Tool Review: Makita Scrollsaw SJ401

Introduction:
Everybody starts something somewhere. While I grew up beside my grandfather that does everything from metalwork, woodwork, plastic work and even watch repairing (all as a hobby), this scrollsaw is what started me in woodworking. Bought initially to do modifications for my computer casing to do acrylic cutting, it did not take long before I was cutting wood. I found a website that boasts great works with the machine and I was hooked.
It came in this box.

Included in the box:
Two allen wrenches, a round wrench (for locking the head in place while replacing the blade), six pinned type blades, the warranty registration and the owners manual.

This scrollsaw is variable speed which is something you want in a scrollsaw. Prevents burned cuts and blade overheating. The ON switch is easily accessible in front as well as the speed control.

It will accept pinned type and plain blades. This makes buying better and thinner blades. Pinned types are limited to thick ones and less options. this is what I mean (the pinned type is at the rightmost).


I have removed the hold down clamps which limits cutting fast and fast turns. And the dust blower works great at keeping the cutline visible at all time.

The aluminum table tilts up to 45° to the left and 15° to the right for bevel cuts. And is easily adjustable with the front lever. And shown is the dust control port for vacuum attachment.

It comes with a minimal 1.2 ampere motor which makes for cool operation even at long operations.

The base is made of cast iron which adds to its weight to reduce vibration.

My Verdict:
This machine is built like a tank except for the table which could have used another type of material other than aluminum. the vibration can be improved but minimal. As any Makita item locally, accessories are very hard to come by, even from their distributor. Overall, this machine is a good buy compared to what our limited market is limited to. As to price, I don't understand why most of the time this Makitas sell higher here than the UK market when we are much closer to its sources.

My rating:
Built: 8/10
Vibration: 7/10
Dust Collection: 6/10
Price: 5/10
Performance Overall: 8/10

Pls. post your comments, I would appreciate it.

Saturday, February 14, 2009

locally available 2000 grit sharpening stone

I have been looking all over for a good sharpening stone. A friend (Owyn) offered one of his Naniwa 1000 grit Japanese stone and I grabbed it of course without hesitation. I continue to look for higher grits the like of 8000. I thought that the Naniwa 1000 grit although bought locally is very rare what else can I expect higher grits?
Well today I found two stones with higher than the 1000 grit. Its not Naniwa but I am certain that they were Japanese stones. The first one a class "B" 1200 grit stone ( I was told to purchase the other as it is better, I trust this vendor with his advice ) and the other, a 2000 grit class "A" Japanese stone which I purchased of course. I rushed home and opened my new stone.
First impressions were that the stone is flat without flattening necessary and that the texture is very smooth.


The stone measures 180 mm x 80 mm, just about perfect for honing all the hand plane blade sizes.
I placed it under water for 5 minutes just to soak in and gave my No. 4 blade a light honing. To my surprise, it cuts faster than the Naniwa stone and very clean. I was very pleased with the results just from a few strokes on it. I places the second bevel and just like the primary, it was no hassle with just about six strokes and the bevel is there. a light pass at the strop and in comes the back bevel. I did cut some pine endgrain and forgot to take some pictures of it. So, the next thing was to install the chip breaker and assemble it back. Did some minor tweaking just to center the blade and viola...


This Japanese stone should be available to all filipino handplane enthusiast. It makes sharpening much easier. A similar stone I found was in the knives store and costs Php 3,000.00. This one costs much much less and seems to be the same. Except, the ones in the knives store carries the Japanese signature which mine did not have.
Overall remark:
this stone is a must have for the sharpening buffs.

Leave a comment when you can. I would appreciate this.

HOW TO use the router table as a jointer

Introduction:
I have always wanted powertools as much as I can acquire, unfortunately plenty of those are beyond my budget. so I started to understand what my other tools can do. As such I found that my router table can be used as a jointer. Limited only by the router bit cutting length. Recently I got myself a 1/2" shank straight bit with a 2" cutting lenght.

The process:
I mount the straight bit on the router table. I make it a point that the router bit tips point towards the center of the table. This way I know that the carbide bit is highest in relation to the fence.

I then add a spacer on the outfeed side of the fence, this offsets it by about 1/32". The spacer (cut out piece of cardboard ) thickness determines the thickness of what will be removed or trimmed from the wood.

Then I set the fence opening leaving as little as possible so that the piece would be supported as much as possible, but leaving enough space to the chips to be removed with the dust collector (vacuum cleaner).

I then set the outfeed side of the fence (with a straight rule) to touch the router bit. Using the fine tune adjustment, I can set it to exactly where it touches.


Set up the router bit height so that it would be just a fraction higher than the wood to be jointed.

I mark the side to be jointed with chalk so I would know if the face has been completely trimmed.

You can see here the wood being removed from the stock (very minimal which is my preference).

And here you can see the removed area as I stopped the cut. Just to give you an idea of the process.

As I resume cutting, notice that pressure should be applied on the outfeed side of the wood.

After finishing the cut, I checked for straightness and if it is square to the reference side. .. What is nice is, it always is.


Leave a comment when you can. I would appreciate this.

Thursday, February 12, 2009

HOW TO flatten a handplane sole

Introduction:
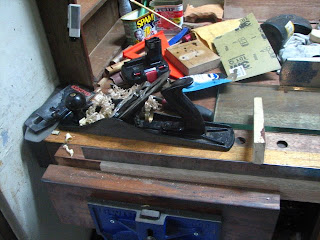
It is easy to get thin shavings down to thousands of an inch, but it seems you still end up with low portion at the ends of your boards. Check the sole of your handplane ( the easiest is with a straight rule ) and if it isn't flat then you now know the cause. An uneven sole will give false reference for the blade at the start and end of the board/piece thus leaving you with either low or high ends. Some handplanes like LN and LV boast flatness to a high degree of accuracy, but besides not being available to Filipinos are priced much higher than the Stanley ( which off course is you get what you pay for ). I have several Stanley handplanes one of which is from my grandfather No.4 (dated 1938) and is truly flat. Unfortunately the others are recent buys and out of the box, their soles are TERRIBLE! Here is what I did to my new Stanley No.5 to tune it up.

Tools and materials used:
flat surface (1/2" glass)
mechanic's blue
flat files (coarse and fine)
roller (I used a lint remover)

The process:
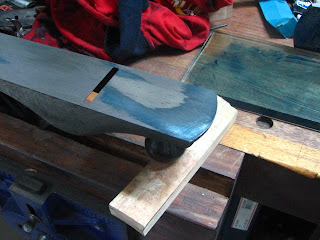
Start off by removing the handplane chip breaker and blade and clean thoroughly especially the sole. then spread the mechanic's blue to the glass and spread evenly with a roller to create a thin blue film.


then place the handplane sole down to the glass and press lightly.

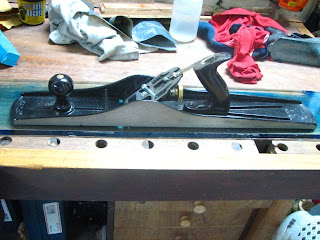
then lifting the handplane straight up, you will see the high spots making contact with the flat surface. this is what you will need to scrape off.

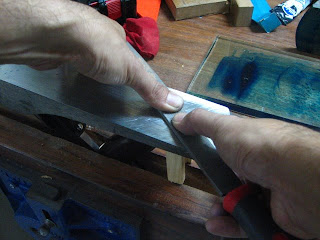
I mount the handplane upside down (sole side facing up) on my bench vise with the frog intact for a secure filing. You don't want it moving around.

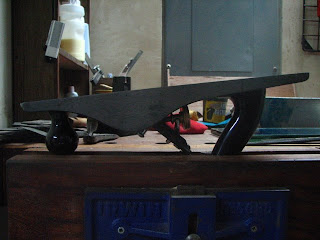
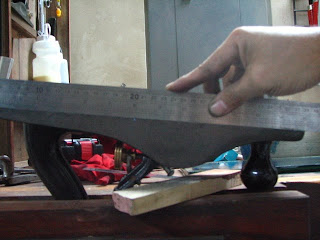
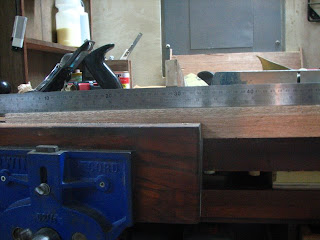
With a straight rule you can see the low spots against the light and will be the deciding factor as to how much needs to be removed.

Others will recommend using the scary sharp method (in which a sandpaper is mounted on the flat surface) and flattening with it. Well I have tried it and I can tell you that besides the process is easy, it tends to leave your plane sole convex. this is due to the sandpaper removing the material faster on the sides or concave if you continue using the sandpaper longer than intended, because the middle will wear slower than the corners. Besides, it takes forever to get this process done. I have tried it and it left my arms sore and the soles not close to flatness.
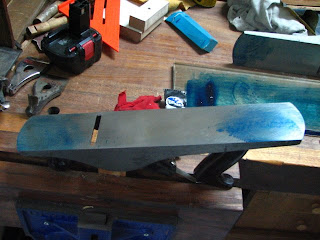
Now depending on the blue markings you can scrape metal from either direction. but upon closer inspection on mine, I noticed that the front area is pretty much flat till the mouth area. So I decided to remove metal from the back portion first.
I removed the blue keeping a mental picture of where it was (this prevents clogging the files and knowing where to stop filing). Keep your fingers or apply pressure in the center of the file, this prevents it from racking side to side which will leave you with low spots at the corners.

I start filing vertically, this gives me reference to a leading edge and not creating another low spot. Vertically from left then from the right leaving cross pattern and removes faster too. Which leaves me with a warning "remove little at a time and continuously check your progress" its not an easy process and it will test your resolve...

After a considerable amount of metal has been removed from the back I can now move to the front portion. Again Always Check!
After removing a certain amount from the front, I came up with this. Low spot at the middle area. I'm still alright though as I would want the front area and right after the mouth to be flat. It should be After the mouth!

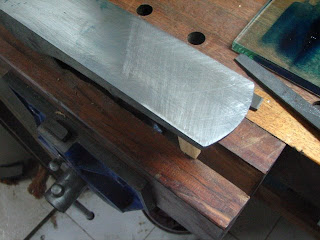
File some more until I am happy with the results. and before finishing I scrape the sole (using the file as a scraper) forward to give a smoother consistency and file lightly lengthwise just to smoothen the surface. Again keep those fingers within the sole's center as much as possible.

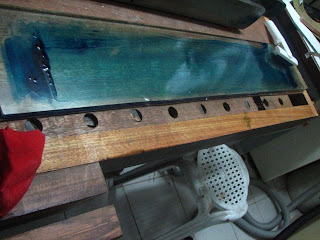
Check for squareness and flatness with the straight rule and if everything is to your satisfaction, clean and wax the sole and the sides. Install the blade and chip breaker then plane away. After several passes, you should be left with a straight piece of wood.

Now, purist will double check the sole's flatness with a feeler gauge against the flat surface. I can't find mine so I'll just skip that for now. Oh and here is the planed surface.


This is how I flattened my handplanes, now, should you try to follow this process, be aware of the risks and that you can damage your handplane and that I will not be responsible for your actions. For what its worth, I hope this helps though...


Leave a comment when you can. I would appreciate this.